Hair Knowledge
What Is a 360 Lace Wig? Everything You Need to Know
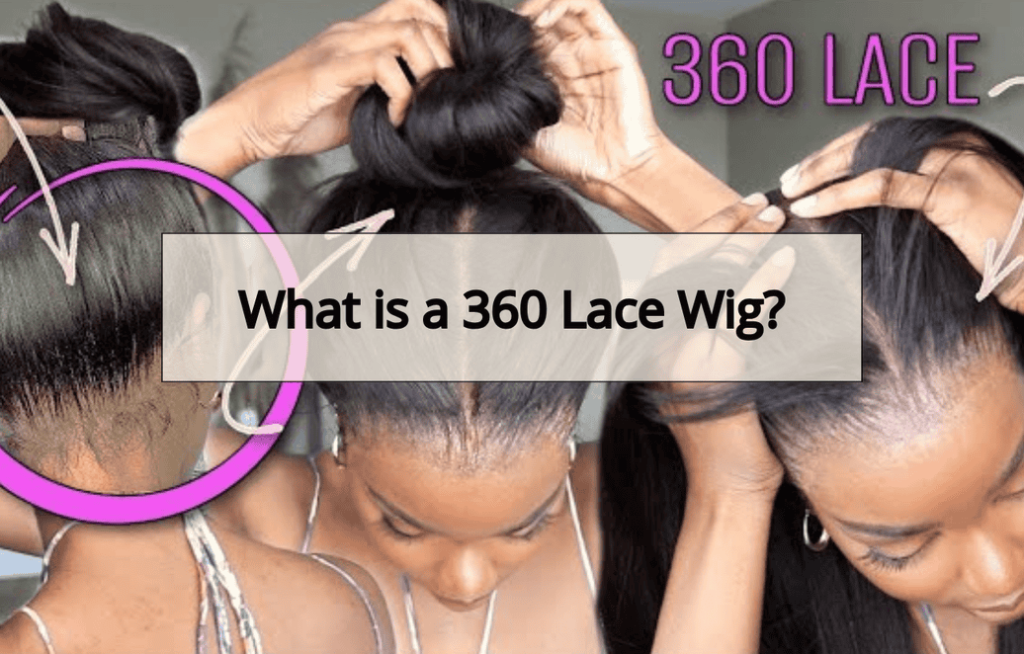
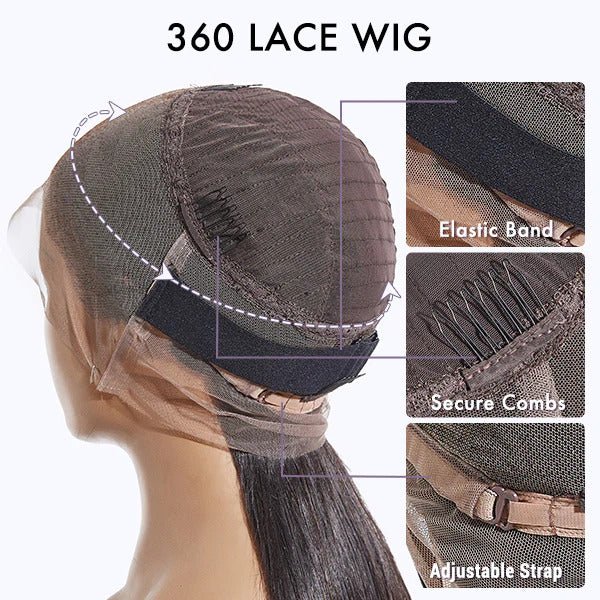
I. What Is a 360 Lace Wig?
A 360 lace wig is a hybrid style that offers the best of both full lace and lace front wigs. It features a lace base that circles the entire perimeter of the head—hence the name “360”—with a machine-sewn weft cap in the center. This design allows for high versatility in styling while maintaining structure and affordability.
Unlike full lace wigs (which are hand-tied throughout the entire cap), 360 lace wigs focus on creating a natural hairline all around the edges, allowing you to pull your hair into high ponytails, buns, or half-up styles without exposing wefts.
Structure and Design
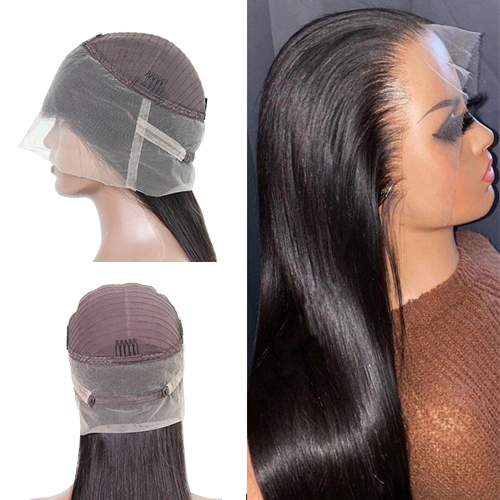
The main defining feature of a 360 lace wig is its lace-covered outer edge:
-
Lace Perimeter: The lace runs around the front hairline, sides, and nape of the neck. This allows you to part your hair anywhere along the edge and wear it in updos or high ponytails without revealing tracks or wefts.(About 4 inches in the front and 2–2.5 inches in the back and sides.)
-
Wefted Center: The interior cap is made of breathable, stretchable fabric with machine-sewn wefts. This gives the wig volume and durability, while keeping the cost lower than a full lace wig.
-
Pre-Plucked Hairline: Most 360 wigs come with a pre-plucked hairline and baby hairs around the front and back, giving the appearance of natural hair growth from the scalp.
Key Characteristics
-
Full Styling Versatility: You can wear a 360 lace wig in a low bun, high ponytail, half-up styles, or even braids along the edges.
-
Breathability: The lace perimeter and open weft cap allow for better airflow than traditional wigs.
-
Secure Fit: Equipped with combs and an adjustable strap, a 360 lace wig offers a snug fit that stays put even during active days.
-
Quicker Install than Full Lace: Since only the perimeter is lace, the installation process is faster and easier than a full lace wig while still offering more freedom than a lace front.
II. Pros of 360 Lace Wigs
360 lace wigs are becoming a go-to choice for clients who want more versatility than a lace front wig but don’t need the full flexibility (and price tag) of a full lace wig. Here are the key benefits that make 360 lace wigs stand out:
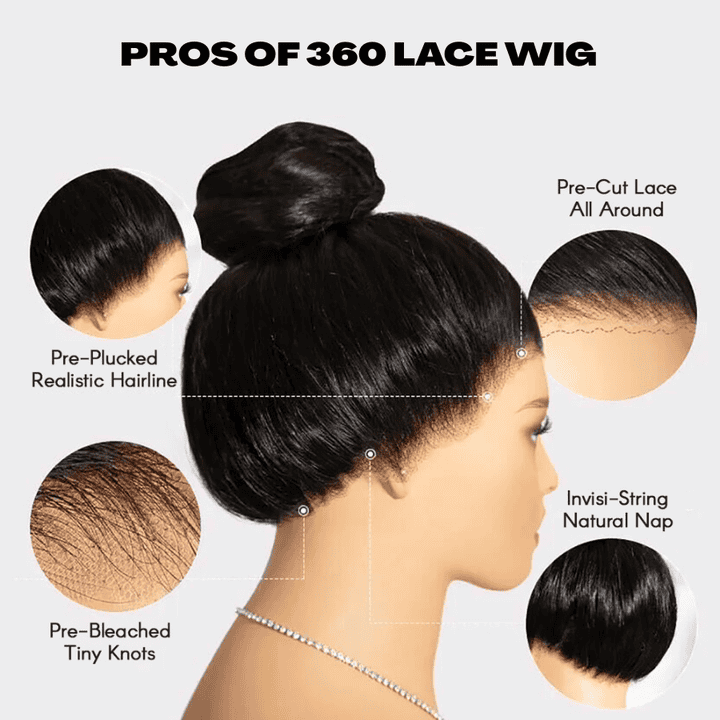
1. Natural Hairline All Around
A 360 lace wig features lace that goes all the way around the perimeter of the wig—from the front hairline to behind the ears and around the nape. This creates a seamless, natural look from every angle, especially when pulling the hair up into ponytails, buns, or half-up styles.
2. Great for High Ponytails & Updos
Unlike lace front wigs (which only offer lace at the front), 360 lace wigs allow for full updos. The lace at the back provides a realistic nape area, making high ponytails and elegant buns look completely natural—perfect for special occasions or daily wear.
3. Pre-Plucked Hairline and Baby Hair
Most 360 wigs come with a pre-plucked hairline and baby hairs along the front and back. This gives a softer, more natural appearance without the need for heavy customization, saving you time in the styling process.
4. Easier to Install than Full Lace Wigs
While 360 lace wigs offer more coverage than lace front wigs, they’re still easier to install than full lace wigs. The wefts sewn into the crown area make them less delicate, and quicker to apply—especially if you’re using a glueless or adjustable-strap method.
5. More Affordable than Full Lace
You get the styling freedom of a full lace wig—with a lower price tag. 360 lace wigs offer a great balance between flexibility and cost, making them ideal for those who want versatility without the full investment of a hand-tied cap.
6. Breathability and Comfort
The lace perimeter provides good airflow around the edges of the scalp, reducing discomfort from heat and sweat. It’s a comfortable option for those who wear wigs long hours or in warmer climates.
III. Cons of 360 Lace Wigs
While 360 lace wigs offer a great combination of realism and styling flexibility, they are not without drawbacks. Here are the key disadvantages to consider before buying or recommending this wig type to clients:
1. Requires Advanced Installation Skills
Unlike basic lace front wigs, a 360 lace wig typically needs to be glued or sewn down around the entire perimeter—not just the front. This process requires skill and precision to ensure the lace lays flat and looks natural. Beginners may find the installation process time-consuming or intimidating.
💡 For salon professionals: 360 wigs can be a great upsell, but your stylists need proper training in lace application to avoid visible lines or damage.
2. Time-Consuming Maintenance and Reapplication
360 lace wigs aren’t a throw-on-and-go solution. To maintain the best look and hygiene, users need to:
-
Remove and clean the wig regularly (every 1–2 weeks for daily wear).
-
Re-glue or sew it back in place.
-
Clean excess adhesive from the lace and hairline.
This can become a hassle for busy users or those new to lace wigs.
3. Heavier Than Full Lace Wigs
Although lighter than fully wefted wigs, a 360 lace wig still has a machine-wefted center, which adds bulk. Compared to full lace wigs—which are lace-based throughout—the 360 version can feel slightly heavier and less flexible, especially when worn all day.
If your client is sensitive to weight or scalp pressure, this may be a concern.
4. Less Breathable Than Full Lace Wigs
Since only the perimeter is made of lace, the crown area has less ventilation. This means the scalp won’t breathe as easily as with a full lace wig. In warmer climates or for users with sensitive or sweaty scalps, this can cause discomfort over time.
5. Mid-Range Price Without Full Lace Benefits
While 360 lace wigs are more affordable than full lace wigs, they still cost significantly more than lace front wigs. However, they don’t offer full freedom in parting styles—you can’t part the hair anywhere on the crown like you can with a full lace wig.
This makes them a “middle ground” choice, which may not be ideal for clients seeking either affordability or complete styling freedom.
6. May Require Customization for a Natural Look
Not all 360 wigs come pre-plucked or with bleached knots. If the wig is not pre-customized, you’ll need to:
-
Pluck the hairline manually to create a natural edge.
-
Bleach the knots to remove visible dark spots at the lace base.
These tasks require care, time, and proper products—otherwise, you risk damaging the lace or creating an unnatural appearance.
IV. How to Install a 360 Lace Wig (Step-by-Step Guide)

Installing a 360 lace wig properly is key to achieving a natural hairline, secure fit, and long-lasting wear. Unlike basic lace front wigs, a 360 lace wig wraps around your entire head, so it requires a more detailed installation process.
Below is a step-by-step breakdown of the three most common installation methods: glueless, glue/adhesive, and sew-in. Choose the one that best suits your lifestyle, experience level, and duration of wear.
🔹 Option 1: Glueless Installation (Beginner-Friendly)
Ideal for temporary wear, daily use, or clients who want to avoid adhesives.
You Will Need:
-
Wig cap or stocking cap
-
Edge control or gel
-
Wig with adjustable straps and combs
-
Optional: wig grip band for extra security
Steps:
-
Prep your natural hair:
Braid or slick it back into flat cornrows or a low ponytail. Apply edge control to smooth baby hairs. -
Wear a wig cap:
Use a thin, skin-toned cap to protect your natural hair and help the wig lay flat. -
Put on the wig:
Place the wig on your head and adjust the position of the lace perimeter along your natural hairline. -
Secure the wig:
Use the adjustable straps at the back and combs inside the cap to lock the wig into place. -
Style as desired:
Part the hair, apply light makeup along the hairline if needed, and style in a bun, ponytail, or let it down.
✅ Best for short-term wearers or those who want to remove the wig daily.
🔹 Option 2: Adhesive/Glue Installation (Most Natural Look)
Ideal for long-lasting wear (up to 1–2 weeks) and high-styling flexibility, including updos.
You Will Need:
-
Lace adhesive (glue or gel)
-
Scalp protector
-
Blow dryer (cool setting)
-
Rat-tail comb
-
Elastic band or wig melting band
Steps:
-
Cleanse your skin:
Use alcohol wipes to clean the forehead area, removing any oils or residue. -
Apply scalp protector:
To prevent irritation and extend adhesive hold. -
Place and align the wig:
Carefully place the 360 lace wig on your head and align the lace with your natural hairline all around. -
Apply glue along the perimeter:
Use a thin layer of glue (front, sides, and back). Let it dry until tacky, then gently press the lace onto the skin. -
Use a blow dryer:
On a cool setting, press the lace down using the end of a rat-tail comb to ensure it melts into your skin. -
Wrap with an elastic band:
Leave it wrapped for 10–15 minutes to “melt” the lace into the scalp and secure the hold. -
Trim excess lace:
Use small curved scissors to carefully trim off extra lace for a seamless finish.
💡 Optional: Bleach the knots and pluck the hairline before installation for the most realistic look.
🔹 Option 3: Sew-In Installation (Salon Professional Method)
Recommended for clients who want maximum security for long-term wear (3–4 weeks).
You Will Need:
-
Needle and thread (matching hair color)
-
Wig cap
-
Hair clips
-
Braiding tools
Steps:
-
Braid the natural hair into flat cornrows.
A circular or beehive pattern works well to keep the base flat. -
Apply the wig cap.
This provides a smooth surface and protects the natural hair underneath. -
Place the 360 wig onto the head.
Make sure the lace lines up perfectly with the natural hairline around the head. -
Sew the perimeter:
Use a curved needle and thread to sew the lace down along the front, sides, and back of the head. -
Style the wig:
Once sewn down, you can style the wig in any direction, including ponytails, buns, or braids.
✂️ Maintenance appointments every few weeks are recommended to tighten or remove the unit safely.
🔧 Extra Tips for a Flawless Install
-
Bleach the knots for a more scalp-like appearance.
-
Tint the lace if it’s too light for your skin tone.
-
Use a hot comb to flatten the wig at the roots for a sleek finish.
-
Always use a satin scarf or bonnet at night to protect the lace and prolong the life of the install.
V. How to Care for a 360 Lace Wig
Proper care is essential to maintain the beauty, softness, and longevity of your 360 lace wig—especially if it’s made with 100% human hair. Whether you wear it daily or occasionally, a consistent haircare routine will ensure your wig stays tangle-free, natural-looking, and in excellent condition.
Here’s a step-by-step guide to help you care for your 360 lace wig like a pro:
1. Wash the Wig Regularly (Every 7–10 Wears)
Over time, wigs collect product buildup, sweat, and environmental dirt. Washing your wig helps restore its bounce, shine, and movement.
✅ Steps:
-
Detangle the hair with a wide-tooth comb before wetting.
-
Use lukewarm water and sulfate-free shampoo.
-
Gently wash in a downward motion—do not rub or twist the hair.
-
Rinse thoroughly until the water runs clear.
💡 Never soak the wig for too long, and avoid hot water—it can damage both the lace and the hair cuticle.
2. Deep Condition for Moisture and Softness
After shampooing, always use a hydrating conditioner or deep treatment mask to restore moisture—especially if the wig has been heat styled.
✅ Tips:
-
Apply conditioner from mid-lengths to ends.
-
Leave on for 5–15 minutes depending on dryness level.
-
Rinse with cool water to seal the cuticle.
💬 Avoid applying conditioner to the lace or knots, as it can loosen them over time.
3. Air Dry the Wig Naturally
The best way to dry your 360 lace wig is to let it air dry on a wig stand or mannequin head.
-
Gently pat the hair with a towel—do not rub.
-
Place it on a wig stand to maintain its shape.
-
Allow it to dry completely before styling or storing.
⚠️ Avoid blow-drying unless absolutely necessary. If you must, use low heat and a heat protectant.
4. Detangle with Care
Always detangle your wig before and after wear to prevent matting and breakage.
✅ Best Practices:
-
Use a wide-tooth comb or a paddle brush.
-
Start from the ends and work your way up.
-
Be gentle near the lace to avoid shedding or tearing.
5. Limit Heat Styling
Although human hair wigs can handle styling tools, excessive heat can dry out or damage the hair over time.
-
Use a heat protectant spray before curling or straightening.
-
Avoid daily heat styling—opt for heatless styles when possible.
-
If using a flat iron or curling wand, keep the temperature under 180°C (356°F).
6. Store the Wig Properly
How you store your wig when it’s not in use affects its longevity.
-
Place the wig on a wig stand to retain its shape.
-
Keep it in a satin or silk bag to reduce friction and tangling.
-
Store in a cool, dry place away from direct sunlight and heat.
7. Handle the Lace with Extra Caution
The lace on a 360 wig is delicate. Mishandling can cause tears, stretching, or premature shedding.
Avoid:
-
Pulling or tugging at the lace.
-
Scratching or brushing too close to the lace base.
-
Overusing adhesives that are hard to remove.
🧴 Always use professional lace adhesive removers during take-down.
8. Professional Maintenance (Optional but Recommended)
If you’re wearing your 360 lace wig long-term or frequently styling it, schedule maintenance with a professional stylist every 3–4 weeks.
They can:
-
Reinstall the wig safely
-
Deep clean and detangle
-
Refresh curls or silk-press
-
Reinforce lace edges or re-sew any loose areas
Final Thoughts
A 360 lace wig is the perfect middle ground between a lace front and a full lace wig. It gives you natural edges, flexible styling, and a comfortable fit, all at a mid-range price. Whether you’re a salon owner or a wig enthusiast, investing in a quality 360 lace wig can seriously upgrade your hair game.