Hair Knowledge
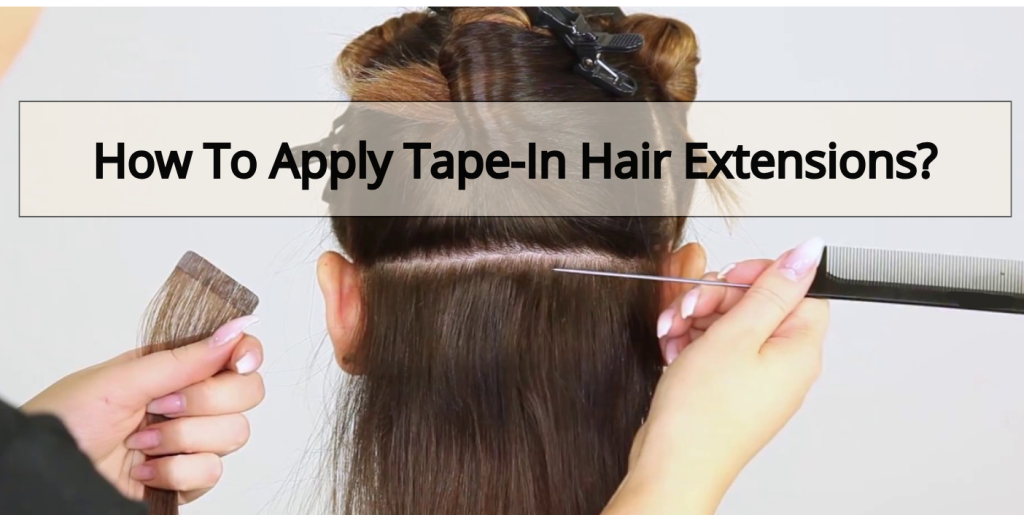
How to Apply Tape-In Hair Extensions: A Step-by-Step Professional Guide
I. Introduction
Tape-in hair extensions are among the most popular semi-permanent extension methods in Europe today. Their natural look, lightweight feel, and reusability make them a salon favorite. However, to get the best results, proper installation is essential. In this guide, we’ll walk you through how to apply tape-in hair extensions like a pro—whether you’re a stylist or a trained user. Follow these steps to ensure strong, invisible bonds that last 6–8 weeks without slippage or discomfort.
II. What You Need Before Starting
Before applying tape-in hair extensions, preparation is everything. The right tools, clean hair, and a proper setup will not only make the installation process smoother—it will directly impact the durability, comfort, and natural look of the final result.
🧰 Essential Tools & Supplies
Make sure you have the following ready:
| Item | Purpose |
|---|---|
| Tape-In Extensions (Pre-Taped) | High-quality human hair with medical-grade adhesive backing |
| Tail comb / Rat-tail comb | For precise sectioning and parting |
| Sectioning clips | To hold hair cleanly in place and improve visibility |
| Clarifying shampoo | To prep the client’s natural hair by removing oil and residue |
| Hairdryer (optional) | To ensure the hair is 100% dry before installation |
| Flat pliers or fingers | To press and bond the tape evenly |
| Flat iron (optional) | For light reinforcement (low heat only; not mandatory) |
💡 Pro tip: Choose extensions made with Remy or Virgin hair and double-drawn ends for better blending, especially for clients with thin or blunt-cut hair.
🧼 Client Hair Preparation
The condition of your client’s natural hair will directly affect the strength of the bond and the longevity of wear. Here’s how to prepare it properly:
1. Wash with Clarifying Shampoo Only
- Use a sulfate-free, clarifying shampoo to remove buildup, oil, or silicone from previous products.
- Do not use conditioner or mask—these create a slippery base that prevents the tape from sticking.
2. Dry the Hair Completely
- Hair must be 100% dry before installation. Even slight moisture can weaken the tape bond and lead to slippage within days.
- Blow-dry thoroughly, paying special attention to the root area.
3. Detangle with Care
- Use a loop brush or wide-tooth comb to remove all knots or tangles.
- Start from the ends and work upward. This prevents tension and helps with smoother application.
🔍 Note for stylists: If the client’s hair is naturally oily or prone to product buildup, you may recommend a detox shampoo routine 1–2 days before their tape-in session.
📝 Optional but Recommended
- Scalp analysis: Check for signs of sensitivity, excessive oil production, or flaking. Tape-in may not hold well on oily or irritated scalps.
- Allergy check: If it’s the client’s first time with tape-in extensions, test a small section on the nape to rule out irritation.
- Plan your layout: Decide how many sandwiches (pairs of tapes) are needed, based on the client’s head shape, hair thickness, and volume goals.
✅ Summary
Before installing tape-in extensions, ensure:
- The hair is clean, dry, and product-free
- You have all professional tools ready
- You plan your rows and understand the client’s hair texture and expectations
Starting strong ensures the result looks and feels like natural, voluminous hair—without any slip-ups later.
III. How to Apply Tape-In Hair Extensions (Step by Step)
Tape-in extensions are known for their quick application and seamless result—but only when applied with proper technique. Below is a full breakdown of the professional process, designed to maximize hold, comfort, and natural blending.
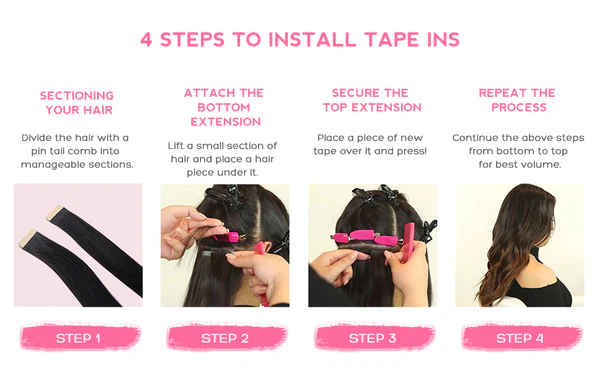
Step 1: Create Clean, Horizontal Sections
Start by sectioning the hair from the nape of the neck upward.
- Use a tail comb to part the hair into horizontal rows, each around 1–1.5 cm apart.
- Clip the remaining hair securely out of the way using sectioning clips.
💡 Pro tip: Keep your rows clean and even. Precise partings help the extensions lie flat and blend invisibly.
Step 2: Select the Right Amount of Natural Hair
Each tape-in extension needs a small slice of natural hair sandwiched between two adhesive wefts.
- Use the tail comb to lift a section of natural hair about the same width and length as the extension tape (usually 4 cm wide).
- The section should be thin enough for the adhesive to bond through it but thick enough to support the weight of the extension.
Visual cue: You should be able to slightly see through the natural hair section when held against the light.
⚠️ Too thick? The tapes won’t bond. Too thin? The tapes may pull and cause breakage.
Step 3: Apply the Bottom Tape Extension
- Peel off the protective paper from the adhesive backing.
- Place the bottom extension piece underneath the natural hair section, roughly 0.5–1 cm from the scalp.
- Press it upward gently so that the hair lays flat against the tape.
📏 Important: Never apply directly on the scalp—this allows for natural movement and avoids tension.
Step 4: Sandwich with the Top Tape
- Take the matching top extension and remove its tape cover.
- Carefully align and place it on top of the hair section, directly matching the bottom piece.
- Press the top and bottom pieces together firmly with your fingers or flat pliers.
✋ Pro tip: Hold pressure for 8–10 seconds to activate the adhesive bond.
✅Step 5: Repeat Methodically Across the Head
Continue applying row by row, working from the lower layers upward.
- Leave 1–1.5 cm spacing between sandwiches, especially along the sides.
- Avoid the hairline, crown, and temple areas unless using invisible or mini tape-ins.
Key spacing tips:
- From the crown: leave 2–3 cm
- From the sides: stay at least 1.5 cm in to avoid visibility when tucking behind ears
✅ Step 6: Final Check & Styling
Once all extensions are in:
- Brush through the hair gently using a loop brush
- Trim and blend the ends for a seamless, layered finish (if needed)
- Avoid heat or washing for at least 48 hours to allow the adhesive to fully set
Common Mistakes to Avoid
| ❌ Mistake | ✅ Solution |
|---|---|
| Applying too close to the scalp | Leave 0.5–1 cm space |
| Using thick hair sections | Keep sections thin and even |
| Not drying hair before install | Always apply on 100% dry hair |
| Letting oil products touch the tape | Recommend silicone-free products |
| Installing uneven rows | Use a mirror or assistant for proper symmetry |
Final Thoughts
Learning how to apply tape-in hair extensions correctly is more than just sticking wefts—it’s about creating a flawless, invisible, and comfortable result for your client. Whether you’re working with virgin hair or premium Remy tape-ins, proper technique ensures long wear, client satisfaction, and easy reuse.
At N Hair Factory, we provide salon-quality virgin tape-in hair extensions—pre-taped and ready for seamless application. We also offer training tips, custom orders and EU shipping.
Related Articles
Tape-In Hair Extensions: Everything You Need to Know
Do Tape-In Extensions Damage Your Hair?
Can You Reuse Tape-In Hair Extensions?